How-to
Find model keys
Keys are listed under the Public keys section within each model class in torchreid.models.
Show available models
import torchreid
torchreid.models.show_avai_models()
Change the training sampler
The default train_sampler is “RandomSampler”. You can give the specific sampler name as input to train_sampler, e.g. train_sampler='RandomIdentitySampler' for triplet loss.
Choose an optimizer/lr_scheduler
Please refer to the source code of build_optimizer/build_lr_scheduler in torchreid.optim for details.
Resume training
Suppose the checkpoint is saved in “log/resnet50/model.pth.tar-30”, you can do
start_epoch = torchreid.utils.resume_from_checkpoint(
    'log/resnet50/model.pth.tar-30',
    model,
    optimizer
)

engine.run(
    save_dir='log/resnet50',
    max_epoch=60,
    start_epoch=start_epoch
)
Compute model complexity
We provide a tool in torchreid.utils.model_complexity.py to automatically compute the model complexity, i.e. number of parameters and FLOPs.
from torchreid import models, utils

model = models.build_model(name='resnet50', num_classes=1000)
num_params, flops = utils.compute_model_complexity(model, (1, 3, 256, 128))

# show detailed complexity for each module
utils.compute_model_complexity(model, (1, 3, 256, 128), verbose=True)

# count flops for all layers including ReLU and BatchNorm
utils.compute_model_complexity(model, (1, 3, 256, 128), verbose=True, only_conv_linear=False)
Note that (1) this function only provides an estimate of the theoretical time complexity rather than the actual running time which depends on implementations and hardware; (2) the FLOPs is only counted for layers that are used at test time. This means that redundant layers such as person ID classification layer will be ignored. The inference graph depends on how you define the computations in forward().
Combine multiple datasets
Easy. Just give whatever datasets (keys) you want to the sources argument when instantiating a data manager. For example,
datamanager = torchreid.data.ImageDataManager(
    root='reid-data',
    sources=['market1501', 'dukemtmcreid', 'cuhk03', 'msmt17'],
    height=256,
    width=128,
    batch_size=32
)
In this example, the target datasets are Market1501, DukeMTMC-reID, CUHK03 and MSMT17 as the targets argument is not specified. Please refer to Engine.test() in torchreid.engine for details regarding how evaluation is performed.
Do cross-dataset evaluation
Easy. Just give whatever datasets (keys) you want to the argument targets, like
datamanager = torchreid.data.ImageDataManager(
    root='reid-data',
    sources='market1501',
    targets='dukemtmcreid', # or targets='cuhk03' or targets=['dukemtmcreid', 'cuhk03']
    height=256,
    width=128,
    batch_size=32
)
Combine train, query and gallery
This can be easily done by setting combineall=True when instantiating a data manager. Below is an example of using Market1501,
datamanager = torchreid.data.ImageDataManager(
    root='reid-data',
    sources='market1501',
    height=256,
    width=128,
    batch_size=32,
    market1501_500k=False,
    combineall=True # it's me, here
)
More specifically, with combineall=False, you will get
=> Loaded Market1501
  ----------------------------------------
  subset   | # ids | # images | # cameras
  ----------------------------------------
  train    |   751 |    12936 |         6
  query    |   750 |     3368 |         6
  gallery  |   751 |    15913 |         6
  ---------------------------------------
with combineall=True, you will get
=> Loaded Market1501
  ----------------------------------------
  subset   | # ids | # images | # cameras
  ----------------------------------------
  train    |  1501 |    29419 |         6
  query    |   750 |     3368 |         6
  gallery  |   751 |    15913 |         6
  ---------------------------------------
Optimize layers with different learning rates
A common practice for fine-tuning pretrained models is to use a smaller learning rate for base layers and a large learning rate for randomly initialized layers (referred to as new_layers). torchreid.optim.optimizer has implemented such feature. What you need to do is to set staged_lr=True and give the names of new_layers such as “classifier”.
Below is an example of setting different learning rates for base layers and new layers in ResNet50,
# New layer "classifier" has a learning rate of 0.01
# The base layers have a learning rate of 0.001
optimizer = torchreid.optim.build_optimizer(
    model,
    optim='sgd',
    lr=0.01,
    staged_lr=True,
    new_layers='classifier',
    base_lr_mult=0.1
)
Please refer to torchreid.optim for more details.
Do two-stepped transfer learning
To prevent the pretrained layers from being damaged by harmful gradients back-propagated from randomly initialized layers, one can adopt the two-stepped transfer learning strategy presented in Deep Transfer Learning for Person Re-identification. The basic idea is to pretrain the randomly initialized layers for few epochs while keeping the base layers frozen before training all layers end-to-end.
This has been implemented in Engine.train() (see torchreid.engine). The arguments related to this feature are fixbase_epoch and open_layers. Intuitively, fixbase_epoch denotes the number of epochs to keep the base layers frozen; open_layers means which layer is open for training.
For example, say you want to pretrain the classification layer named “classifier” in ResNet50 for 5 epochs before training all layers, you can do
engine.run(
    save_dir='log/resnet50',
    max_epoch=60,
    eval_freq=10,
    print_freq=10,
    test_only=False,
    fixbase_epoch=5,
    open_layers='classifier'
)
# or open_layers=['fc', 'classifier'] if there is another fc layer that
# is randomly initialized, like resnet50_fc512
Note that fixbase_epoch is counted into max_epoch. In the above example, the base network will be fixed for 5 epochs and then open for training for 55 epochs. Thus, if you want to freeze some layers throughout the training, what you can do is to set fixbase_epoch equal to max_epoch and put the layer names in open_layers which you want to train.
Test a trained model
You can load a trained model using torchreid.utils.load_pretrained_weights(model, weight_path) and set test_only=True in engine.run().
Fine-tune a model pre-trained on reid datasets
Use torchreid.utils.load_pretrained_weights(model, weight_path) to load the pre-trained weights and then fine-tune on the dataset you want.
Visualize learning curves with tensorboard
The SummaryWriter() for tensorboard will be automatically initialized in engine.run() when you are training your model. Therefore, you do not need to do extra jobs. After the training is done, the *tf.events* file will be saved in save_dir. Then, you just call tensorboard --logdir=your_save_dir in your terminal and visit http://localhost:6006/ in a web browser. See pytorch tensorboard for further information.
Visualize ranking results
This can be achieved by setting visrank to true in engine.run(). visrank_topk determines the top-k images to be visualized (Default is visrank_topk=10). Note that visrank can only be used in test mode, i.e. test_only=True in engine.run(). The output will be saved under save_dir/visrank_DATASETNAME where each plot contains the top-k similar gallery images given a query. An example is shown below where red and green denote incorrect and correct matches respectively.

Visualize activation maps
To understand where the CNN focuses on to extract features for ReID, you can visualize the activation maps as in OSNet. This is implemented in tools/visualize_actmap.py (check the code for more details). An example running command is
python tools/visualize_actmap.py \
--root $DATA/reid \
-d market1501 \
-m osnet_x1_0 \
--weights PATH_TO_PRETRAINED_WEIGHTS \
--save-dir log/visactmap_osnet_x1_0_market1501
The output will look like (from left to right: image, activation map, overlapped image)
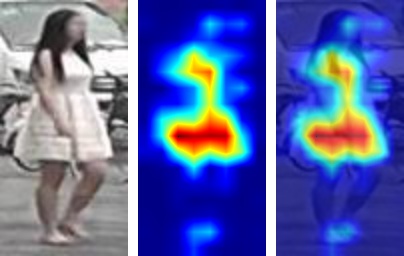
Note
In order to visualize activation maps, the CNN needs to output the last convolutional feature maps at eval mode. See torchreid/models/osnet.py for example.
Use your own dataset
Write your own dataset class. Below is a template for image dataset. However, it can also be applied to a video dataset class, for which you simply change
ImageDatasettoVideoDataset.
from __future__ import absolute_import
from __future__ import print_function
from __future__ import division

import sys
import os
import os.path as osp

from torchreid.data import ImageDataset


class NewDataset(ImageDataset):
    dataset_dir = 'new_dataset'

    def __init__(self, root='', **kwargs):
        self.root = osp.abspath(osp.expanduser(root))
        self.dataset_dir = osp.join(self.root, self.dataset_dir)

        # All you need to do here is to generate three lists,
        # which are train, query and gallery.
        # Each list contains tuples of (img_path, pid, camid),
        # where
        # - img_path (str): absolute path to an image.
        # - pid (int): person ID, e.g. 0, 1.
        # - camid (int): camera ID, e.g. 0, 1.
        # Note that
        # - pid and camid should be 0-based.
        # - query and gallery should share the same pid scope (e.g.
        #   pid=0 in query refers to the same person as pid=0 in gallery).
        # - train, query and gallery share the same camid scope (e.g.
        #   camid=0 in train refers to the same camera as camid=0
        #   in query/gallery).
        train = ...
        query = ...
        gallery = ...

        super(NewDataset, self).__init__(train, query, gallery, **kwargs)
Register your dataset.
import torchreid
torchreid.data.register_image_dataset('new_dataset', NewDataset)
Initialize a data manager with your dataset.
# use your own dataset only
datamanager = torchreid.data.ImageDataManager(
    root='reid-data',
    sources='new_dataset'
)
# combine with other datasets
datamanager = torchreid.data.ImageDataManager(
    root='reid-data',
    sources=['new_dataset', 'dukemtmcreid']
)
# cross-dataset evaluation
datamanager = torchreid.data.ImageDataManager(
    root='reid-data',
    sources=['new_dataset', 'dukemtmcreid'],
    targets='market1501' # or targets=['market1501', 'cuhk03']
)
Design your own Engine
A new Engine should be designed if you have your own loss function. The base Engine class torchreid.engine.Engine has implemented some generic methods which you can inherit to avoid re-writing. Please refer to the source code for more details. You are suggested to see how ImageSoftmaxEngine and ImageTripletEngine are constructed (also VideoSoftmaxEngine and VideoTripletEngine). All you need to implement might be just a forward_backward() function.
Use Torchreid as a feature extractor in your projects
We have provided a simple API for feature extraction, which accepts input of various types such as a list of image paths or numpy arrays. More details can be found in the code at torchreid/utils/feature_extractor.py. Here we show a simple example of how to extract features given a list of image paths.
from torchreid.utils import FeatureExtractor

extractor = FeatureExtractor(
    model_name='osnet_x1_0',
    model_path='a/b/c/model.pth.tar',
    device='cuda'
)

image_list = [
    'a/b/c/image001.jpg',
    'a/b/c/image002.jpg',
    'a/b/c/image003.jpg',
    'a/b/c/image004.jpg',
    'a/b/c/image005.jpg'
]

features = extractor(image_list)
print(features.shape) # output (5, 512)